How To Clean A Super Grubby Griphoist
Instructions for T-516 and some notes for TU-17 and T-508
writing and drawings by Zyla
(I wrote this while working for the Green Mountain Club; some of the directions are specific to their workshop. I trust that you can spot them and substitute whatever makes sense for where you are.)
recommended tools and supplies
- 13 mm crescent wrench
- ratchet with 13mm socket
- flat screwdriver
- rags
- bottle brush
- tub big enough to fit griphoist into
- kerosene
- small empty containers like yogurt cups or tin cans
- air compressor
- popsicle sticks
- lots of space to spread things out
- patience
- oil
- safety goggles
- rubber gloves
all of these things should be somewhere in the north barn or milk house. Look for a box labeled griphoist repair in the Pirk shop closet, the small stuff should mostly be in there. If the supplies on this list are for some bizarre reason unavailable to you it is possible to clean a griphoist with nothing more than some rags, a leaterman, pliers and a good healthy stubborn streak. Be warned, working with this greatly abbreviated supply list while possible makes the job take much longer and doesnt get the griphoist as clean
Procedure
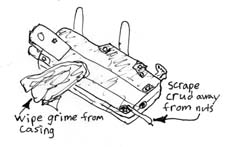 1. Clean the outside of the griphoist.
Using a rag wipe off the grime and chunks. If mud is caked around the nuts scrape it away with a popsicle stick or screwdriver.
1. Clean the outside of the griphoist.
Using a rag wipe off the grime and chunks. If mud is caked around the nuts scrape it away with a popsicle stick or screwdriver.
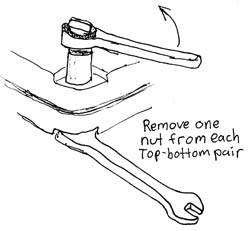 2. Loosen the bolts that hold the two casing halves together.
The wrenches work great for this. The bolts are threaded on both ends and each one has two nuts. Hold the bottom nut still with the crescent wrench while undoing the top nut with the socket wrench. Remove one nut from each pair, I recommend taking the top one off but some of them are stuck and it doesnt much matter which nut you remove as long as you get one from each pair. As you remove the nuts put them someplace where they wont get lost or roll away.
2. Loosen the bolts that hold the two casing halves together.
The wrenches work great for this. The bolts are threaded on both ends and each one has two nuts. Hold the bottom nut still with the crescent wrench while undoing the top nut with the socket wrench. Remove one nut from each pair, I recommend taking the top one off but some of them are stuck and it doesnt much matter which nut you remove as long as you get one from each pair. As you remove the nuts put them someplace where they wont get lost or roll away.
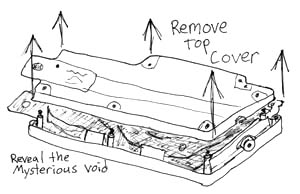 3. Remove the top half of the griphoist casing.
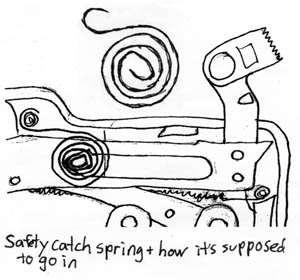
The pieces are often reluctant to part so it may be necessary to encourage them a little with the screwdriver. Gently insert the screwdriver in between the two halves and pry a little. Once the gap has widened some move the screwdriver to the other side and again gently pry the pieces apart. Moving along the gap repeat the prying until the casing has been loosened enough for you to get a good finger hold and pull the pieces apart. A spring might be connecting the griphoist innards to the casing, if you notice a spring joining the two it will prevent complete removal of the casing half. Reach in and disconnect one end of the spring from its anchor. If you dont see this spring dont worry, its on the other side instead of in your way.
3. Remove the top half of the griphoist casing.
The pieces are often reluctant to part so it may be necessary to encourage them a little with the screwdriver. Gently insert the screwdriver in between the two halves and pry a little. Once the gap has widened some move the screwdriver to the other side and again gently pry the pieces apart. Moving along the gap repeat the prying until the casing has been loosened enough for you to get a good finger hold and pull the pieces apart. A spring might be connecting the griphoist innards to the casing, if you notice a spring joining the two it will prevent complete removal of the casing half. Reach in and disconnect one end of the spring from its anchor. If you dont see this spring dont worry, its on the other side instead of in your way.
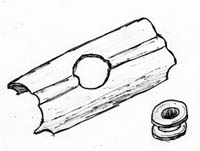 4. scrape slimy gunk out of griphoist.
I recommend popsicle sticks for this, but anything flat and thin will work. Basically, the idea is to get as much dirty crud as you can out of the machine without disassembling it. Rags work well for cleaning the big spaces. The front plate thingamawhosit and round thimble sort of thing are going to fall out soon so take them out now, wipe them off and put them someplace where you wont loose them.
4. scrape slimy gunk out of griphoist.
I recommend popsicle sticks for this, but anything flat and thin will work. Basically, the idea is to get as much dirty crud as you can out of the machine without disassembling it. Rags work well for cleaning the big spaces. The front plate thingamawhosit and round thimble sort of thing are going to fall out soon so take them out now, wipe them off and put them someplace where you wont loose them.
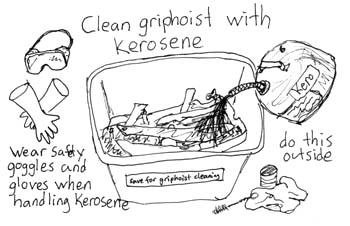 5. Clean griphoist with kerosene.
Go into the milk house and find the jug of kerosene and big plastic tub that are labeled LTP for griphoist cleaning. Place the griphoist minus its top cover into the tub and pour the kerosene onto it. Now scrub out all the dirt and grease that are left in the thing. Use the bottlebrush for scrubbing inside the cable guides and other small spots. A tin can is useful for dumping kerosene over and through parts. Be careful to keep the griphoist innards on the bottom of the casing, there are some pins that up until now were glued into place by slime and dirt, once the crud layer has been removed these pins like to fall out. Kerosene is flammable and probably not great to breath. Do this step out in the yard so that you dont burn the barn down. It is a good idea to wear gloves and safety goggles when handling kerosene. Wash the griphoist parts that arent attached to the main mess, top cover, thingamawhosit, etc.
5. Clean griphoist with kerosene.
Go into the milk house and find the jug of kerosene and big plastic tub that are labeled LTP for griphoist cleaning. Place the griphoist minus its top cover into the tub and pour the kerosene onto it. Now scrub out all the dirt and grease that are left in the thing. Use the bottlebrush for scrubbing inside the cable guides and other small spots. A tin can is useful for dumping kerosene over and through parts. Be careful to keep the griphoist innards on the bottom of the casing, there are some pins that up until now were glued into place by slime and dirt, once the crud layer has been removed these pins like to fall out. Kerosene is flammable and probably not great to breath. Do this step out in the yard so that you dont burn the barn down. It is a good idea to wear gloves and safety goggles when handling kerosene. Wash the griphoist parts that arent attached to the main mess, top cover, thingamawhosit, etc.
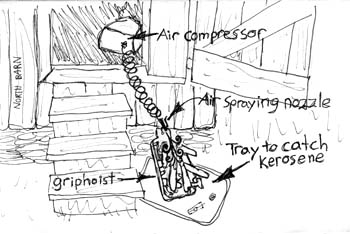 6. Blow excess kerosene and last remnants of dirt out of griphoist.
In the Pirk shop there is a plastic tub labeled air compressor. Go get it. Take the compressor out of the tub, attach the hose and plug the contraption in by the door. Back outside at the kero tub locate the tubs lid, this is important, the lid is used as a tray to catch kerosene as it is blown out of the griphoist, preventing the kerosene from soaking into the lawn and allowing it to be dumped back into the tub. Fish the griphoist out of the kerosene, hold it above the tub a few seconds to allow the major dripping to run back into the tub. Then carry it over to the lid, turn on the air compressor and spray air through all the nooks and crannies so that everything thats not supposed to be in there is forced out. The air compressor is loud, you might want ear protection.
6. Blow excess kerosene and last remnants of dirt out of griphoist.
In the Pirk shop there is a plastic tub labeled air compressor. Go get it. Take the compressor out of the tub, attach the hose and plug the contraption in by the door. Back outside at the kero tub locate the tubs lid, this is important, the lid is used as a tray to catch kerosene as it is blown out of the griphoist, preventing the kerosene from soaking into the lawn and allowing it to be dumped back into the tub. Fish the griphoist out of the kerosene, hold it above the tub a few seconds to allow the major dripping to run back into the tub. Then carry it over to the lid, turn on the air compressor and spray air through all the nooks and crannies so that everything thats not supposed to be in there is forced out. The air compressor is loud, you might want ear protection.
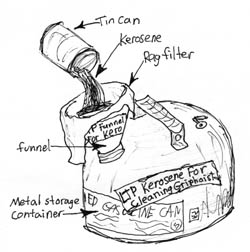 7. Filter Kerosene back into metal storage container.
Do this when you are all done kerosening griphoists for the day. That might be now or maybe itll be three griphoists later. Line the funnel with a relatively clean rag and insert the little end into the metal container. Hold the funnel with one hand and a tin can with the other. Use the can as a scoop to transfer the kerosene from the tub to the funnel. When the rag becomes so gummed up with grease kerosene wont filter through it anymore either adjust it so that a clean portion is now in the funnel or get a different one. When all the kerosene is in the metal container put the lid on, wipe the slimy sludge out of the plastic tub and put the tub, its lid, funnel, kerosene and tin can back in the milk house where you found them.
there are easier ways to do this. see plans for construction of super duper kerosene filter or just leave the dirty kero in a bucket for a week or two and then decant it.
7. Filter Kerosene back into metal storage container.
Do this when you are all done kerosening griphoists for the day. That might be now or maybe itll be three griphoists later. Line the funnel with a relatively clean rag and insert the little end into the metal container. Hold the funnel with one hand and a tin can with the other. Use the can as a scoop to transfer the kerosene from the tub to the funnel. When the rag becomes so gummed up with grease kerosene wont filter through it anymore either adjust it so that a clean portion is now in the funnel or get a different one. When all the kerosene is in the metal container put the lid on, wipe the slimy sludge out of the plastic tub and put the tub, its lid, funnel, kerosene and tin can back in the milk house where you found them.
there are easier ways to do this. see plans for construction of super duper kerosene filter or just leave the dirty kero in a bucket for a week or two and then decant it.
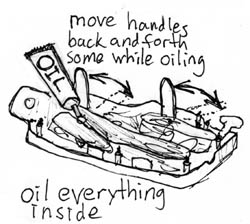 8. Oil griphoist.
Use the oil that was purchased specially for the griphoist. If you dont know what oil this is go ask people until you find someone who does. Put lots of oil all over the griphoist innards, especially where moving parts touch each other. Move the crank levers back and forth some to help the oil get into all the little gaps. Theres no such thing as too much oil (well, maybe if theres an inch of oil covering everything and it gushes out of the casing every time you touch it, that would be excessive) so if in doubt add a little more. SAE 90-100 oil is recommended by the griphoist manufacturer.
8. Oil griphoist.
Use the oil that was purchased specially for the griphoist. If you dont know what oil this is go ask people until you find someone who does. Put lots of oil all over the griphoist innards, especially where moving parts touch each other. Move the crank levers back and forth some to help the oil get into all the little gaps. Theres no such thing as too much oil (well, maybe if theres an inch of oil covering everything and it gushes out of the casing every time you touch it, that would be excessive) so if in doubt add a little more. SAE 90-100 oil is recommended by the griphoist manufacturer.
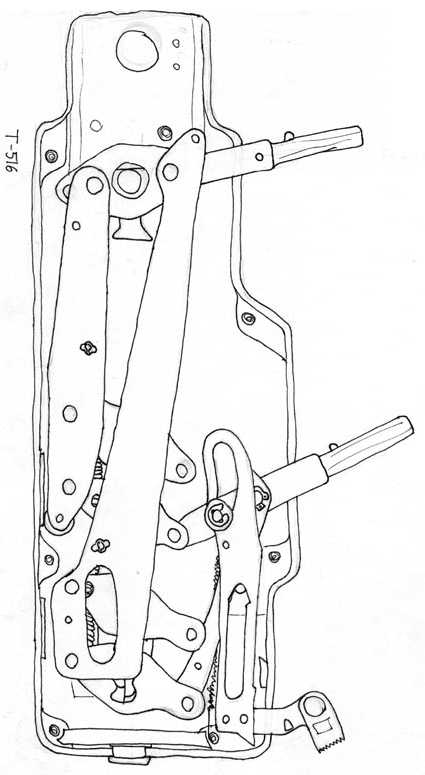
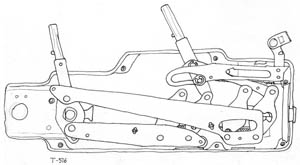
 9. Put the parts that you removed while cleaning back into the griphoist.
bigger picture of griphoist without cover
9. Put the parts that you removed while cleaning back into the griphoist.
bigger picture of griphoist without cover
TU-17
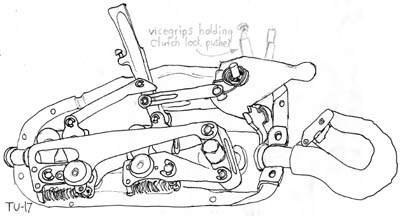 Same process as for 516 except the griphoist is a little different. You will need vice grips,needle nose vicegrips, 10 mm and 11 mm wrenches.
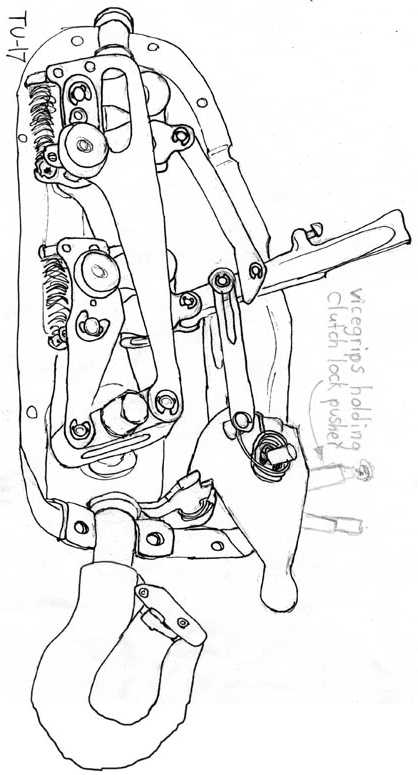
large drawing of TU-17 without lid
Same process as for 516 except the griphoist is a little different. You will need vice grips,needle nose vicegrips, 10 mm and 11 mm wrenches.
large drawing of TU-17 without lid
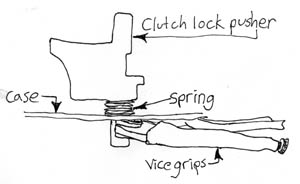 When putting the TU-17 back together there are two parts, the clutch lock pusher and its spring, that are incredibly non-cooperative. The spring likes to push the clutch lock pusher out of place before you can get the case together. If you use vice grips to hold the CLP and spring in place getting the casing back together will be much easier. Use the needle nose vice grips to hold the clutch lever in place, and watch out for the spring that attatches to it, the spring sometimes gets out of place.